The photos show how to make this string:

Drive two nails into a table or board, the distance between nails equaling intended string length. A special adjustable jig can be made for this, but unless you’re going into the string making business there is little point. Determine the number of strands needed: breaking strength of one strand, divided into four times the bow's draw weight. Wind the string back and forth around the nails until desired strand number is reached. Be careful to apply equal tension on each strand.

Tie the two loose ends together.

Slide the string around the nails a few inches so the knot can be covered by serving.

Serve for about three inches. Use medium-fine soft cotton, silk, or linen. Serve similarly at the other end.
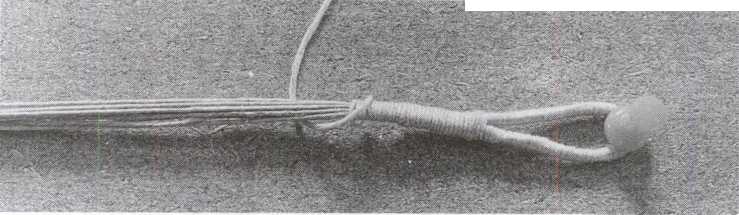
Slide the string back to its original position. Form loops by pulling the strings together and serving. 220
When loops have been formed at both ends of the string brace the bow and serve a few inches at its nocking point. Serve lightly. Any mass added here slows cast as if added to the arrow itself.
It is better to avoid twisting the string. But if too long it can be twisted to shorten. With practise exact lengths can be dependably made.
Roberts, in The English Bowman of 1801, makes this recommendation: "Fine glove-leather or any kind of tape or binding, wrapped round the eye of the string, will preserve it from being cut by the nock of the horn." Roberts had Flemish strings in mind, but his advice is also sound for endless strings.
The Flemish String
The design of the English warbow string is lost to us. Was it of old Flemish design? Quoting from Gordon, "Unfortunately, no bowstrings survive to us from the heyday of English military archery..."
We know, however, that these strings must have been of very high quality. Eor safety under military conditions a 120-plus lb. bow would need at least a 400 lb. string. The remains of English military arrows are about 3/8" wide at the nock. Judging from photos of these nocks, strings were not over 1/8" in diameter. For a 1/8" string to safely draw a 120-plus IK bow it must be made to the very highest standards. It would be nice to read a twist-by-twist accounting of the making of these strings.
The Flemish string is not mentioned in the 1833 Archer's Guide, London, But in 1845 The Book of Archery reports: "1 believe few bowstrings are now made in England, the great mart being Flanders, where both materials and workmanship are excellent."
Duff, writing in 1930, claims that, "... for over five hundred years the Belgian bowstring makers have had an almost complete monopoly of the bowstring business."
Gordon believed that the "Flemish secret" rested, "... in the use of the long native-flax fibers worked and built into string directly from the distaff without the intermediate step of conversion into thread. It is this trick that gives the Flemish string its smooth 'whole' appearance and defied its analysis for a long time."
From what we now know of the need for uniform. ity, and of the thicker-is-weaker problem, we can be fairly certain that Gordon's interpretation of the "Flemish secret" was in error. Unless the flax was glued it had to be twisted, and if twisted it had to be spun into small diameter fibers to have decent strength. The flax spinners of Belgium were too expert not to know this. By the later 1,300's their product was so refined the king of France sent fine linen cloth to the Saracens as ransom for captured crusaders.
Many "Flemish" designs have replaced the original. The common denominator of these designs is, 1), A built-in plaited loop, 2), Some or all of its length is reverse-twisted.
The "Primitive" Flemish String
I
This string is made of two or three plies of unspun fibers, using the fingertwisting or thigh-twisting method, reverse-twisting its full length.
Since the primary plies in such a string are relatively thick, all fibers will not be strained uniformly. Because of this, and because of inevitable thinner/weaker spots in each ply, such a string can not be as strong as one carefully made from a larger number of smaller primary plies. To the archer this means a thicker, therefore more massive, therefore slower-shooting string. In the range of two or three times more massive, depending on the level of skill involved. Given an average weight bow and arrow, and assuming a proper margin of strength safety, this translates to five to ten fps reduction in cast. Cast reduces to as much as an 8 lb. lighter bow.
A High Quality Flemish String
Arrange two nails about one and one-third bow length apart.
To know how many threads will be needed per ply, perform a breaking strength test. Break several short lengths of thread to determine average strength. Determine the number of threads needed per ply or sub-ply.
Unwind self-spun or commercial thread around the nails, endless-string fashion, using no more than seven threads per ply or sub-ply. If using commercial thread, single-ply is preferred. When finished, pinch one end and snip or lift it free from its nail. Keeping the ply slightly taut, let it unwrap naturally around itself. Set this ply aside and repeat as needed.
There is no need to actively reverse twist each of the threads. Each ply in the 7-ply shoemakers' cord was actively reverse twisted, but need not have been if the seven plies were to be used as a primary ply, as here.
If making a simple string you will probably wind out three plies. If making a complex string you will probably wind out nine plies.
If complex, reverse twist the nine plies into three finished three-ply cords, then reverse twist these three cords into into a three-ply complex cord. For more uniform strain, and to save time, use the drill method.


TaJr
The plaited loop. Taper the last four inches of each ply. Wax the last twelve inches fairly heavily. 222

The plaited loop: Starting about nine inches from the tapered ends, make about three inches of reverse-twist cordage.

Bend these few inches of cordage into a loop, resting one "W" directly atop the other.

Continue reverse-twisting each double-thick ply as if they were one. The tapered ends will blend smoothly into the main string body. Stop just as the taper ends.


Secure the loop at the end of its taper, where reverse-twisting was halted. Tie a knot at each of the other ends. These knots should be at precisely the same place in each ply: plies shorten when twisted; you will know each ply has been twisted equally when all three knots are even. Each ply can be spun by twisting with fingers, on the thigh, by hand drill, or electric drill. Spin each ply separately. Spin until the ply is almost inclined to kink. Set the twisted ply aside, secured by a nail or weight. Once all three plies are spun individually in one direction, place all three together and spin backward until cordage is complete. Keep mild tension in the string. Again, use fingers, thigh, or drill.
The string can be finished by finger twisting, but the final product would not be as uniform, and would take twenty-minutes or longer to complete. The drill method is faster, and produces more evenly strained results. Secure the finished loop in a vise or such so that strain can be put on the untwisted plies without unwinding the loop. Reverse-twist the full string using the drill method, described earlier.
Plaited loops are somewhat sloppy and unevenly strained on four-ply and higher strings. When plaiting four or more even-numbered plies plait the loop as if making a two-ply string, separating the plies just before the splice tapers end. For odd-numbered plies, divide the odd ply temporarily among the other plies while forming the loop.
Tie a timberhitch in the string, about four inches short of bow length (see Knots, farther on). Brace the bow, low at first. The string will stretch. Adjust the hitch and rebrace. A low brace height puts greater strain on the string, removing stretch more completely. If you trust yourself, use this Jim Hamm trick: Hold the bow as if reverse-floor tillering, then press forward on the back of the grip. This puts tremendous strain on the string. If strung low enough, the bow can be made to strain the string to its breaking point. Once you know the limits this is a quick and simple way to remove all feasible stretch from a string. As you flatten the bow its new string will stretch, slowly lowering brace height. The lower the string moves, the greater the leverage brought to bear. Despite this, the string will become progressively harder to stretch, soon becoming rigid. You may have to break one string to learn the limits here. Keep you eye on both limbs and be certain that each is bending equally. If the string does break there is a good chance the bow will follow. Should this occur, note that Jim's address is listed at the front of this book.

Superior rope of any length or diameter can be made using bowstring-making techniques. Ropes need not be so mass-efficient, so each of the three main plys may be formed of many more than seven sub-plies. Self-made ropes of flax or hemp will be far stronger than those of the best commercial Manilla hemp.
A Utility Flemish String
The previous is a high-quality Flemish string. A slightly less efficient, but more quickly assembled version can be made with just two plies, of ten, fifteen or more strands per ply. Add 50% or more strands than normal, for insurance. This string will shoot slower, but it is easy and fast to make, and sometimes that's just what you want.
A Superior Quality Flemish String
A plaited loop is twice as thick as an endless-string loop. The plaited loop is almost twice the strength of the main string. For this reasons there is no absolute need to reinforce the loop of a Flemish string.
The timberhitch at the other end is another matter. The main string is diverted around the nock by the hitch and becomes a focal point of strain and abrasion. This is where such strings generally break, unless reinforced. With practice you will be able to anticipate the amount of stretch in a string. It will then be a simple matter to taper in 50 to 100% additional fiber, starting a few inches before where the hitch will be formed.
Until you can predict the amount of stretch a new string will take the timber-hitch area can be reinforced after the fact: Once the stretch has left a new string and the string's true length is known untwist the string to a point about eight inches before the nock. When intending to reinforce a timberhitch leave the string a couple of inches longer than needed because thicker strings shorten up

Before laying the reinforcement in place untwist the individual plies, otherwise there will be no twist left in them to accept the reinforcements. Once untwisted wax them fairly heavily. Press the first reinforcement in position; to secure it in place reverse-twist the string for one or two cycles. Repeat with reinforcement number two and three. Continue finger-twist cordage making until finished.
More than thinner strings when twisted. Cut fourteen-inch long reinforcements, each equaling 50 to 100% of existing ply diameter. Taper the last four or five inches of one end of each, as with the plaited loop, and wax fairly heavily. Press the reinforcements into place, then continue standard reverse-twist cordage making.
While it's true that a Flemish loop does not have to be reinforced, occasionally such loops will fray. In addition, uneven pressures and angles strain the loop where it joins the string body. Since there is no measurable loss of performance with increased loop weight it is prudent to add 50 to 100% more fiber to the loop when first making it.
Except for reinforcements being tapered at both ends, the loop is reinforced much like the timberhitch. Let the reinforcements be eight to twelve inches long, including taper, and equal 50 to 100% of existing ply diameter. Center these tapered additions where the top of the loop will be. Wax reinforcers heavily enough so they will press into and hold against the well-waxed main string. Tapered portions should lay down smoothly without frizzy ends. Proceed from here as with an unreinforced loop.
Serving is not needed at either loop or hitch, but is useful at the arrow nock. With a reinforced loop and timberhitch, the nocking area is now the chain's weak link, and should be served with fine, soft thread. Use less serving rather than more, because mass on this portion of the string slows arrow speed as if added to the arrow itself. On strings made from commercial thread it is hardly worth burdening the string maker or the string with serving. String material costs 50 cents and takes fifteen minutes to twist into a string. Such easily made strings can be replaced when even slightly frayed, or otherwise suspicious.

A "lucky break." With both loop and hitch reinforced this string's unserved, unreinforced arrow nocking area became the inevitable point of eventual failure. Signs of wear were ignored on this string. In this case the string did not fail completely, about a one-in-three outcome. It is worth noting that overbuilt, low-set bows are far less likely to break when strings fail.
A superior string can be formed by reinforcing the arrow nock area. As the string is first being twisted, add 20% or 30% more fiber, tapered and waxed, as with loop reinforcements. Although serving helps resist wear, it does not prevent it; and neither does it increase strength, which means the entire string length must be made stronger in anticipation of wear. A reinforced nock area will permit the bulk of the string body to be lighter. A light, soft serving in still used, so that reinforcement bulk can be kept low. Too-thick reinforcements do not twist up smoothly. To keep mass low, reinforcement need only be three or four inches long, each end then tapering off to zero over three inches or so.
Positioning the reinforcement requires forethought and practice. Complete the loop and reverse-twist the string almost to its center. Brace the intended bow with a temporary string. Place the new string over the temporary. Modified by experience, allow about one half inch for final string stretch, then mark the estimated nocking point on the new string. Press the reinforcements in place, and twist into place as with the timberhitch reinforcements. Then finish the string as usual.

Vibrating strings will untie the most elaborate knots. This ingenious serving is shake-proof. Its long-forgotten inventor deserves much thanks. At the lower end of the area to be served untwist the plies, push an inch or so of serving through, retwist the cord, and begin serving.


Stop serving about one-quarter inch sooner than intended serving length. Let the serving string rise up into a loop, as shown. Starting just within the right side of this loop, begin serving again, this time serving right to left. Serve about eight or ten turns.

Lay the free end of the serving string horizontally against the bowstring and behind the loop. Using the left side of the loop, continue the original left-to-right serving. You will be encircling the string end just laid behind the loop. Serve this section tightly. Notice that as the serving grows on the left it shrinks on the right.
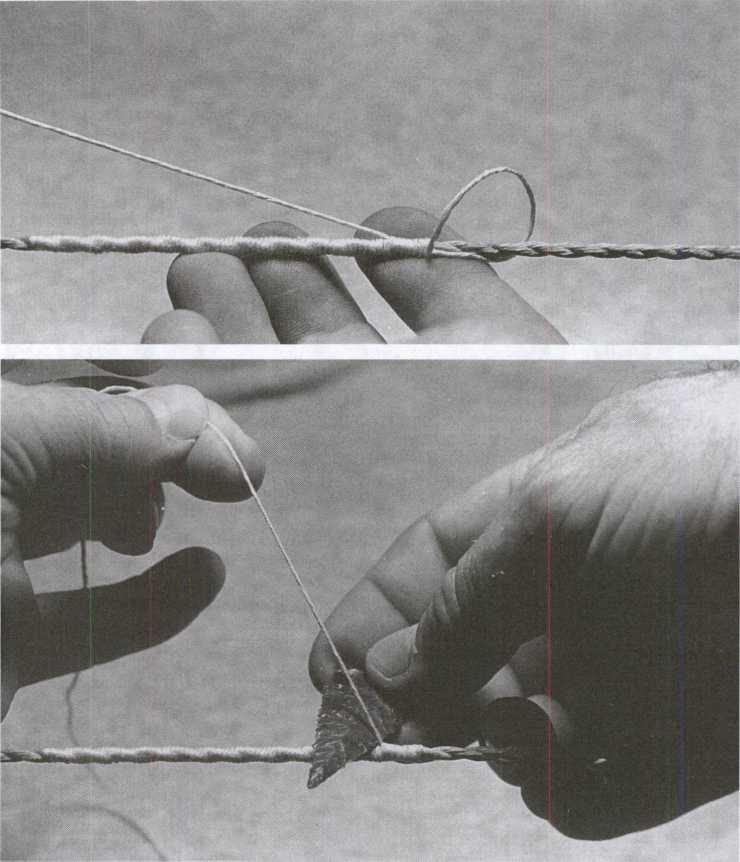
When all eight or ten turns have been used up squeeze the end of the serving and pull the loose end through till taut, then cut it free. Use this serving for endless-string loops, arrow fletching, hafting, and so on.
The Double Loop Flemish
Some archers like a loop on both ends of their Flemish string. Many good arguments are made against this practice but few can be made for it.
Because of the unpredictable string-shortening effects of plaited loop-making, double-loop strings can not be made to exact length. They must be made slightly long, the body then twisted to shorten.
A timberhitch is more convenient than a second loop. It is also easier to make, safer to adjust, and each ply in the string body is equally strained. And strings are more interchangeable.
Before forming the second loop, untwist the twist that has been put into the plies while making the first loop. Untwist more than needed in order to counter whatever twist the second loop will ad. Lay the plies out parallel, making sure they are evenly strained.
While forming the second loop, plies often come into uneven tension, with one ply pulling more than its share of the load. Unless careful attention is paid to this problem, double-loop strings become weaker than those with a single loop.
A New String Design
Made originally due to laziness, this pictured design turned out to be efficient, and quick to make. Strands are wound out endless-string fashion, about eight-inches longer than needed. Starting four inches from one end, serve the loop-to-be for three inches. Fold the serving, forming a loop. Impregnate the four-inch, double-thick area with glue, then serve as with an endless string loop. Brace the bow with a temporary string. Measure second-loop position, and form as above. Allow glue to set before use.

Conventional endless string bodies must be somewhat thicker than needed in order for loops to have sufficient strength to resist abrasion. The loops of this string are twice as thick as those of an endless string, its body can therefore be lighter.
Making the Sinew String
Backstrap or leg sinew from deer, elk, moose, buffalo, cattle, horse, or any hooved animal will make efficient bowstrings. Thick-ply, primitive strings are stronger if made from sinew than from vegetable fiber — despite the fact that vegetable fibers are often stronger than sinew fibers. But how can this be? Why would stronger fibers make weaker strings? Why did Indians prefer sinew when Europeans, shooting far heavier bows, preferred vegetable fibers? Why do current neo-aboriginals report sinew outlasting vegetable fiber bowstrings?
This was a disturbing mystery, but now the answer seems clear. "Primitive" strings are made of two or three thick simple plies. As we have seen, such plies are weaker due to non-uniformity, and having being made thicker to compensate, they now suffer even further from the thicker-is-weaker problem.
"Advanced" strings avoid both problems, being composed of many small threads.
Sinew and other animal fibers, on the other hand, are far less affected by thickness. Their more-strained outer fibers can stretch many times farther than vegetable fibers. Even when strained enough to put inner fibers to work, outer fibers are still stretched below capacity.
In a pinch sinew (also hide and gut) can be obtained from any animal, of any size.
Bird sinew bears investigating. It seems tremendously strong, and might be considerably lighter than that of ground dwellers.
Sinew should be shredded down to fine-diameter fibers. The finer the fiber, the higher the internal friction, the stronger the string. Backstraps shred up quickly, but only the thin, outer portion reduces easily to thread size. The thick, coarser side takes about as much time to reduce as leg sinew.
Leg tendons are tough, but do reduce to fine, more uniform fibers. The smaller tendons on the front of each leg yield finer fibers. Smaller animals yield finer fibers. But larger animals yield longer fibers. For their size buffalo legs yield finer, more easily separated fibers. But this is, literally, splitting hairs. Any sinew will make a good bow string.
The bulk of current opinion says to pound leg tendons to facilitate reduction. This is OK for sinew-backing, but can result in short, broken fibers which must be twisted more tightly. Pristine fibers make stronger strings.
Hupa Indian bowmaker George Blake employes a different method. He uses fresh leg sinews, or soaks dried ones until as soft as if fresh. He cuts the outer sheath open, then pulls fine, full-length, uncrushed fibers free. The string is twisted from these long, fresh fibers, then stretched and dried, resulting in a very smooth, strong string. This technique is reminiscent of the stringmaking method of another California Indian, from 100 miles southeast in space and 76 years in time. Quoting here from a frayed relic, my 1918 first edition of Yahi Archery by Saxton Pope:
"... The tendons used in this were of a finer quality than those used before and were obtained from the outer, more slender group of tendons in the deer's shank. These he stripped far up into their origin in the muscle bundles, tearing them free with his teeth.
If fresh, he simply chewed this tissue and teased it apart into threads no larger than floss silk. If dry, he soaked it in warm water before chewing it. He then proceeded to spin a string by fixing one end of a bundle of tendon strips to a stationary point and rolling the other end between his fingers in a single strand. As he progressed down the string he added more threads of tendon to the cord, making a very tight, simple twist one-eighth of an inch thick. When about five feet long, he twisted and secured the proximal end, leaving his twisted cord taut between two points. The last smoothing-up stage he accomplished by applying saliva and rubbing up and down its length. The finished bow string was now permitted to dry. Its final diameter was about three thirty-seconds of an inch..."
Long sinew fibers can also be pulled from dry leg tendons, sometimes lightly pounded to assist reduction. The string can be twisted dry, or moistened with water or saliva; when wet, sinew is somewhat self-gluing. The strongest sinew
232
I
Strings seem to be made of very fine fibers dampened with saliva, twisted tightly, and dried under tension. If individual fibers have been reduced to properly small diameter, there will be no thick, stubby ends protruding at splice points.
Sinew's natural gluiness can be enhanced. In Secrets of the Omaha Bow, Bill Vonder-hey describes soaldng sinew fibers in hide-glue water before forming the string.
Sinew strings can be made single, double, or triple ply. Fibers can be added as the string progresses, or full-length plies can be assembled first. Loops can be plaited, or tied in later.
Animal strings, being more elastic, might be expected to slow a bow's cast, and they are often reported as doing so. But it's their mass, not their elasticity, which is at fault.
Silk, sinew, rawhide, and gut are quite elastic, as is nylon. But unlike nylon, animal fibers lose this quality once severely stretched. Once strained they take a large, permanent set. By the time an animal-fiber string is broken in, it is quite hard and relatively inelastic. Vegetable fibers behave the same, but less noticeably because they are much less elastic to begin with. Virtually all of an animal-fiber's elasticity can be removed by straining it to near breaking. This will not degrade its strength or durability.
Making the Rawhide String
Rawhide and gut strings will take more abrasion and impact abuse than other natural string materials. Composite bowmaker Jeff Schmidt uses rawhide as a drive belt on his hand-powered wood lathe. Primitive technologist John

An unfinished Walrus rawhide string used for bowstrings by Chinese, Mongols, and Eskimos. The hide is cut, pulled through a round hole while wet, then twisted and smoothed (courtesy Grayson Collection).
McPherson reports that when used to spin fire drills, rawhide strings hold up far longer than flax or sinew.
Rawhide is heavier-per-strength than vegetable fibers, cast is therefore slower. Rawhide seems to ascend in strength-per-mass as animal size descends. Deer is stronger than cow, and A1 Herrin reports from great experience that squirrel and groundhog strings are stronger than deer. A1 describes the Cherokee method of rawhide string making in his book, Cherokee Bows and Arrows.
Smaller animals no doubt make stronger strings partially because wider or more numerous strips are needed. Weak spots are therefore more likely averaged out.
Cut an average-thickness test strip and determine average breaking strength. Then do the arithmetic to determine how wide strips need be for a three-ply string of intended strength. If required strip width is too wide use four or more narrower plies instead.
If possible, arrange any visibly narrower, thinner or weaker areas next to strong areas.
Soak the hide until soft and elastic. Tie plies together at one end and secure them to a nail or such. Arrange the plies in uncluttered, parallel lines, and as individually twist-free as possible. Tie a weight on the bottom and twist the plies until a smooth, uniform cylinder results. Keep the weight in place until the string is dry.
A squirrel-hide string. This spiral-cutting method for creating hide strips can be used for deer, cow, and other hides. Thicker hides require narrower cuts.


If rawhide plies are uniform in thickness and width they will twists into a near-perfect, seamless cylinder of almost manufactured appearance. Slight rises at the seams can be sanded smooth. The finished string can then be oiled or greased for moisture resistance.
The collagen fibers in rawhide and gut are not parallel, as in sinew. They are arranged randomly, like fibers in paper instead of wood. But when formed into strings they are stronger than their randomness would lead us to expect. Dr. Grayson believes that stretching hide or gut aligns fibers more parallel to the direction of elongation.
Making a Gut String
Gut is the easiest and fastest string to make — if you don't count removing and cleaning the gut. And gut is extremely durable — ask a tennis ball.
To determine the number or strands needed when working with unfamiliar gut it's wise to first measure the strength of one strand, then divide that figure into three times the bow's draw weight. Three times bow weight instead of four because gut is more durable, so less margin of safety is needed.
Gut is naturally very uniform along its length. If you feel your rawhide strips are especially uniform three-times bow weight is also a good design decision.
To test strand strength, twist a short length until the gut's natural lumpiness becomes a smooth, uniform cylinder. Do this while pulling at about half its wet breaking strength. Let it dry while under this twist and tension. When dry, break the strand, using a scale to judge its strength.
To make a bowstring, wind out sufficient gut, endless-string fashion. Twist the wet strands tightly together as with a simple-ply, while stretching as with the test strand. Let the string dry in place. If exact bowstring length is known, loops can be formed at this time, and dried in place. If dried without loops rewet loop areas, form any of the various loops or hitches, then let dry again before bracing the bow.

Endless type, four-strand gut string. Wrapped with silk string. Silver wire helps hold the loops. From an old hand-forged steel, one-piece bow, likely Persian (courtesy Grayson Collection).
 World History